Showing posts with label Troubleshooting (camera and camcoder). Show all posts

Wednesday, June 18, 2008

Video quality on the computer using the USB connection is poor quality


When digital video is transferred to a computer using the USB streaming feature on Digital8 digital video cameras and Mini DV camcorders, the quality of transferred video may fluctuate or may contain video noise. This is due to the high compression rate used by the USB streaming protocol. The aspect ratio of video using USB streaming is 352x240 pixels.

Video transferred to a computer using USB from a DVD or hard disk camcorder does not use the USB streaming protocols, therefore, the video is not compressed. The video is transferred at the same resolution that the camcorder recorded the video and should play back on the computer with the same quality in which it was filmed.

Sunday, June 15, 2008

No Removable Drive or Removable disc is not ready is displayed when transferring pictures from the camera to the computer.


A No Memory Stick Found error may be displayed after installing a third-party USB device driver or software on the computer. Follow this procedure to troubleshoot this issue.

IMPORTANT: This issue has been known to happen using the Kodak EasyShare application.

NOTE: Images from the Sony digital camera may be unable to be transferred after installing a third-party USB device driver or application on the computer. The camera may be recognized by the computer, but there may be an error such as No Removable Drive or No Memory Stick Found. This issue can occur when the USB driver for the third-party device or software overwrites some of the files from the USB driver for the Sony camera.

1.Reboot the computer with the Sony camera turned on.
2.Attempt to transfer the images to the computer.
3.Ensure the USB cable is connect directly from the camera to the computer, bypassing any USB hubs or splitters.
4.If the issue is not resolved, reinstall the USB driver for the Sony camera.

NOTE: The USB driver for the Sony camera can be downloaded from the Sony eSupport Web site at http://esupport.sony.com/.

5.Attempt to transfer the images to the computer.
6.If the issue is not resolved, uninstall the third-party software.
7.Attempt to transfer the images to the computer.
8.If the issue is still not resolved, reinstall the USB driver for the Sony camera again.
9.Attempt to transfer the images to the computer.

Sunday, April 27, 2008

The hub does not have enough power or USB Hub Power Exceeded is received when connecting USB devices.


This behavior occurs if there are too many USB devices attached to a passive (unpowered) USB hub. To resolve this error, use one of the options provided.

1.Replace the passive USB hub with an active (powered) hub.
2.Disconnect the affected device from the passive hub and connect it directly to the USB port on the computer.

Additional information is available in the Microsoft Knowledge Base article 310591. You can find it on this link: http://www.microsoft.com/.

Saturday, April 12, 2008

How to connect a camcorder to a VCR using Audio/Video (A/V) cables?


Are you still having problems in connecting your favorite camcorder to a VCR using Audio/Video (A/V) cables? Well I guess yes because you are hardly looking in the web for answers and exact information how to do it or if it is possible. Good thing because you are in the right site and I can give you all the exact information that you will need. First of all, before anything else just make sure that the audio/ video cable that you are currently using is a new one or in proper condition because if it s not, well were going to have a tough time in troubleshooting regarding its connection to the vcr. If the cable is not working or you are not sure if it is defective, please go to the nearest electric or camera and tv parts for verification or check up. So if all items are good to go, follow this procedure to connect a camcorder to a VCR using Audio/Video (A/V) cables.

Connect an A/V cable to the LINE OUT jack on the camcorder.
Connect the other end of the A/V cable to an available LINE IN jack on the VCR.
Turn on the camcorder.
Turn on the VCR.
Tune the VCR to the appropriate line input in which the camcorder is connected.

Thursday, April 10, 2008

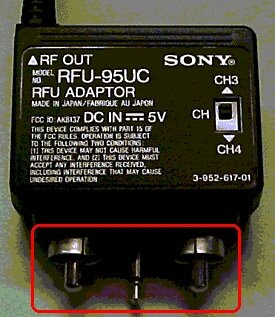
How to connect a camcorder to a television using an RFU adapter?

Basically you will ask first about an RFU Adaptor and what is it for? So let me give you first a refresher about this topic. The RFU adapter connects the camcorder console to televisions that do not have individual audio and video connections. It features two plugs. The first plug has an end that goes directly into the camcorder and the plug goes into the televisions coaxial cable socket. The RFU adapter also features a coaxial cable socket of its own, so you will not have to fiddle the cords when you want to switch from camcorder to television.

It is not that confusing, right? This is only easy as long you will follow the procedures. Read each sentences properly and try to analyze and visualize each of them.

Please follow this procedure in connecting a camcorder to a television using an RFU adapter.
1. Connect the Audio/Video (A/V) connector of the RFU adapter to the A/V output jack on the camcorder.
2. Connect the coaxial cable from the RFU adapter to the VHF/UHF jack on the television.
3. On the RFU adapter, slide the CH switch to CH3 or CH4 (Channel 3 or Channel 4).
4. Turn on the television.
5. Tune the television to the same channel that was selected on the RFU adapter in step 3.
6. On the camcorder, slide the POWER switch to the VTR or PLAYBACK position.
7. Press the PLAY button on the camcorder.

Monday, April 7, 2008

How to connect a camcorder to a television using an S-Video cable?

Another day, another issue, and another answer. Here is our topic for this day. How to connect a camcorder to a television using an S- Video cable? A tricky question but actually it’s easy to install it and for non - technical consumers they will probably say “ What is that?”. Well I did generate here the following steps on how to configure the connection manually. So please follow the steps below to connect a camcorder to a television using an S-Video cable. Always remember that both the camcorder and television must have an S-Video jack to complete this procedure.

Connect one end of an S-Video cable to the S-VIDEO IN jack on the television. Connect the other end of the S-Video cable to the S-VIDEO OUT jack on the camcorder. Connect an audio cable to the appropriate left and right audio input jacks on the television. Connect the other end of the audio cable to the audio output jacks on the camcorder. Turn on the camcorder and set it to the playback mode. Begin playing the media (tape, DVD, etc.) in the camcorder. Turn on the television. Tune the television to the appropriate video input to receive the signal from the camcorder.

Take note that, if necessary try to consult the instruction manual of television for information about tuning the TV to the correct video input.

Sunday, April 6, 2008

How to connect a camcorder to a television using an Audio/ Video cable?

If you are a having problems, or should I say beginner in troubleshooting things especially in connecting or linking devices to each other like TV or computer. I can definitely help you with this issue. On the articles that I am writing in my two websites named as fulfill your dreams and general reviews, you’ll find a relief in troubleshooting this things because the articles that I wrote are all detailed and helpful. For this issue I strongly advise you to follow each procedure to on how to connect a camcorder to a television using an Audio/Video (A/V) cable. Please be reminded that the television must have an available video input jack to complete this procedure. Without these cables there is no possibility that this thing will work.

Connect one end of the A/V cable to an available VIDEO input jack on the television.
Connect the other end of the A/V cable to the A/V OUT or LINE OUT jack on the camcorder.
Turn on camcorder and set it to the playback mode.
Begin playing the media (tape, DVD, etc.) in the camcorder.
Turn on the television.
Tune the television to the appropriate video input to receive the signal from the camcorder.
If it is necessary, consult the instruction manual of television for information about tuning the TV to the correct video input.

Friday, April 4, 2008

Cannot send pictures to email using Cybershot Viewer


For users and consumers of the software cybershot viewer, the question “Cannot send pictures to email using Cybershot Viewer?” is very common. So for people who want an answer for this question here is the perfect article that can surely help you! Just follow the guidelines below:

Can I send a still image by attaching it to an e-mail from Cyber-shot Viewer?
Yes, you can. Follow the steps below:
Select the thumbnail of the image in the thumbnail screen.
Click the E-mail icon. The E-mail images window appears.
Select the image size, and click OK. The E-mail software window automatically pops up with the selected image attached.
Note that you can only send images in JPEG format

Can I send a movie file by e-mail from Cyber-shot Viewer?
No, you cannot send movie files from the Cyber-shot Viewer.

Can I change the size of the image to be attached to an e-mail?
Yes, you can select the following image size options.
JPEG Small: 320x320 or smaller
JPEG Medium: 640x640 or smaller
JPEG Large: 1280x1280 or smaller
User settings: According to the options set in the Advanced Settings.
In Advanced Settings, you can manually specify the maximum image size or ratio to the original image. You can also set the image quality level used for compression.


What e-mail software can be used to send an e-mail from Cyber-shot Viewer?
You can use the following software:
Outlook Express 4
Outlook Express 5
Outlook Express 6
Microsoft Outlook 98
Microsoft Outlook 2000
Microsoft Outlook 2003
NetscapeMail 7.1
Eudora 6


Note: Check if the selected file is not a movie. You cannot attach a movie file to an e-mail with the Cyber-shot Viewer. Also, check if MAPI is enabled in your e-mail software. (For more information about MAPI, refer to the manual or help files of your e-mail software.)

What is MAPI?
MAPI (Messaging Application Program Interface) is a Microsoft Windows program interface that enables you to send e-mail

Wednesday, April 2, 2008

Reverse recording for Tape Camcorders/ Transferring of Videos from the Computer to a Tape Camcorder


(Transferring video footage back to tape camcorder)


If you are asking if it is possible to transfer back the videos that has been transferred in the computer back to the camcorder, yes it is posible.

If the camcorder is DV input enable then you just hit record on the DV device and play the timeline. This assumes you are using an editor that plays out the timeline through a Fire Wire connection. The process is like this, play your timeline in your editor (video editing software) and press record in the VTR mode of your camcorder. Please remember that European Devices do not have this function.

Monday, March 31, 2008

Unable to Retrieve the Management Information


More updates regarding the newest issue in Pictrure Motion Browser Software. Here is the solution if you are having this "Unable to Retrieve the Management Information" error message. Do you know that SPU21_Update0711b.exe - Picture Motion Browser Update? Well, this utility is going to update Picture Motion Browser version 2.2.01.05110 to version 2.2.02.11200 and resolves an issue where images cannot be imported from some non Sony Memory Stick media.
The symptom details when having this issue is when your Handy cam Utility has started, the message "Unable to retrieve the management information." appears and images cannot be imported from the Memory Stick media.
DIG0000191
Here is the specific model number of camera having this issue; the

Model HDR-CX7


Click here to know more about the downloads that can solved this issue.

This is for United States and Canada and and this is for Latin America

Sunday, March 30, 2008

How to recover deleted images from a Memory Stick?


This is the common question that I am encountering in most webtalks and forums with regards to a memory stick. How to recover images that are accidentally deleted in the
memory stick. Actually it may be possible to recover deleted pictures in the memory stick just by using the Memory Stick® File Rescue application. This software is available
as a free download from this link http://esupport.sony.com/perl/swu-download.pl?template=EN&upd_id=%20%202159&SMB=YES .
You can also go to google for more websites where to download memory stick file rescue.

If the Memory Stick File Rescue application is unable to recover the image files, then the Memory Stick media may need to be sent to a professional data recovery service

Thursday, March 27, 2008

Sony's RAW Image Data Converter is ready for Mac OS X


Image Data Converter is compatible to MAC Computer, the it will definitely work with it.
Sony has developed a new RAW Image Data Converter software CD-ROM that includes support for Mac OS X (10.1.5 and higher).
It supplied with DSC-F828 cameras.

Image Data Converter is not manufactured by PIXELA.

Wednesday, January 30, 2008

Sony cybershot driver

Looking for camera driver?

click this link:

www.veilside2ride.blogspot.com

Monday, January 28, 2008

What is DPOF (Digital Print Order format)?


DPOF (Digital Print Order format) is a format which allows the user of a digital camera to define which captured images on the storage card are to be printed, together with information on the number of copies or other image information such as paper size, image title text, image orientation, contact information and more.

Sunday, January 27, 2008

CAMERA USB AND VISTA CONNECTION HELP

All connections like camera, camcorder, memory stick and vista compatibility and how vista works with camera, camcorder and softwares can be answered in just a click!!!

Even HIDDEN USB DRIVERS are available !!!
just follow the link :


http://www.veilside2ride.blogspot.com/

enjoy ^_^