An MS-DOS virus that infects the boot record program on hard disks and floppy disks or the master boot record on hard disks. The virus gets loaded into memory before MS-DOS and takes control of the computer, infecting any floppy disks subsequently accessed. An infected boot disk may stop the computer starting up at all.
Showing posts with label Technical. Show all posts
Tuesday, January 20, 2009
Friday, January 16, 2009
How to install a new PCI card in the desktop computer?
A new PCI card can be installed by opening the computer case and inserting the card in a free PCI slot.
9. Remove the slot cover.
10. Insert the new PCI card into the PCI slot.
11. Replace the screw to ensure the PCI card is locked in place.
WARNING: There is a risk of personal injury. To avoid electrical shock, always turn off and disconnect the computer from power before opening the case.
WARNING: There is a risk of hardware damage. To avoid electrostatic discharge damage, a wrist strap must be used to discharge static electricity while in contact with the internal components of a computer.
WARNING: There is a risk of data loss. Backup all important data before installing additional hardware to the computer.
1. Turn off the computer.
2. Disconnect the computer from power.
3. Ensure the computer is on a hard, flat surface.
4. Face the back of the computer.
5. On the top right corner, pull the metal tab [FIG. 1] until the side panel is released.
2. Disconnect the computer from power.
3. Ensure the computer is on a hard, flat surface.
4. Face the back of the computer.
5. On the top right corner, pull the metal tab [FIG. 1] until the side panel is released.

6. Lift the side panel from the computer.
7. Place the computer down on its side.
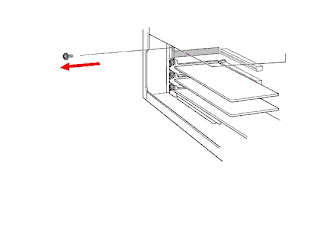
8. On an unused PCI slot, remove the screw holding the slot cover in place [FIG. 2] .
9. Remove the slot cover.10. Insert the new PCI card into the PCI slot.
11. Replace the screw to ensure the PCI card is locked in place.
Tuesday, December 16, 2008
Tuesday, November 25, 2008
Additional physical hard drives are not displayed in the operating system after performing a system recovery
Additional physical hard drives may not be displayed in the operating system after performing a system recovery as the recovery software is not configured to recognize additional physical hard drives. Follow this procedure to activate the additional physical hard drive.
WARNING: There is a risk of data loss. Performing this procedure will erase all data from the additional installed hard drive.
1. Click the Start button, and then click Control Panel.
2. In the Control Panel window, under Pick a category, double-click the Performance and Maintenance icon.
3. In the Performance and Maintenance window, under or pick a Control Panel icon, double-click the Administrative Tools icon.
4. In the Administrative Tools window, double-click the Computer Management icon.
5. In the Computer Management window, in the left pane, under Storage, click Disk Management.
6. In the right pane, click to select the primary partition of the additional physical hard drive.
2. In the Control Panel window, under Pick a category, double-click the Performance and Maintenance icon.
3. In the Performance and Maintenance window, under or pick a Control Panel icon, double-click the Administrative Tools icon.
4. In the Administrative Tools window, double-click the Computer Management icon.
5. In the Computer Management window, in the left pane, under Storage, click Disk Management.
6. In the right pane, click to select the primary partition of the additional physical hard drive.
IMPORTANT: The physical hard drive with the operating system is Disk 0.
7. On the menu bar, click Action.
8. On the Action menu, point to All Tasks, click Delete Partition.
9. On the Action menu, point to All Tasks, click Format.
10. Follow the wizard to complete the format.
8. On the Action menu, point to All Tasks, click Delete Partition.
9. On the Action menu, point to All Tasks, click Format.
10. Follow the wizard to complete the format.
Thursday, November 20, 2008
WARNING!!! HD CONTENT CORRUPTED

Error: HD CONTENT CORRUPTED, USE COMPONENT CABLES is displayed when connected with a Motorola® cable box using HDMI.
Sony has investigated this issue and believe that some Motorola cable boxes were produced with an early version of HDMI software that may cause this symptom. Later versions of the cable box HDMI software have been tested and appear to work properly when connected to Sony TV and Audio/Video Receiver products. Since it is believed to be an issue with the cable box, no service fix is available from Sony; the cable company should be contacted to report this problem.
This issue is known to occur in the following Motorola cable box models:
DCT3412I
DCT6412
DCT6412III
DCT6416III
DCT6412
DCT6412III
DCT6416III
Although the issue has been known to occur with the above cable box models, it is possible that other models may be affected.
NOTE: As a workaround, you can connect the cable box to the TV using a component (Y/Pb/Pr) cable if both the TV and cable box have these connections.
Bright iDEA FROM Sony, right! Good luck ^_^
Friday, October 31, 2008
How to remove unnecessary files from the hard drive?
Files that reside in the Temporary Internet folder are generally unnecessary and can be safely removed from the hard drive.WARNING: There is a risk of data loss. To avoid the unintended loss of data, check the contents of any designated folders before selecting them for cleanup.
1. Click the Start button, point to Programs, point to Accessories, point to System Tools and click Disk Cleanup.
2. In the Select Drive box, click the down arrow and click to select the drive to be cleaned.
3. Click the OK button.
4. In the Disk Cleanup... box, click to select the box next to Temporary Files.
5. Click to select the box next to Temporary Internet Files.
NOTES:
Files found in temporary directories are files that are temporarily created, stored and used by an application or the operating system to run more quickly or efficiently. It is normally safe to delete these temporary files. Additional cleanup location options may also be chosen at this time.
6. Click the OK button.
7. In the Are you sure you want to delete files? box, click the Yes button.
Wednesday, October 29, 2008
SysAid Free Help Desk Software

A new freeware software is here, the SysAid Free Help Desk Software. It's easy to install and the privilages are great. SysAid is a suite of web-based IT software tools and it automates the processes for help desk, hardware configs, asset monitoring, software licenses, tasks, projects and many more. Using this software it automatically scans and test your network, SysAid provides you with the necessary details about each machine and lets you control each one remotely. Amazing software right!
Labels:
Internet,
Technical,
Troubleshooting
Monday, October 27, 2008
Computer Hangs or Restarts When You Connect USB Device 1
Symptoms
When you connect a Universal Serial Bus (USB) device to the USB port on your computer, you may experience any of the following symptoms:
Cause
When you connect a Universal Serial Bus (USB) device to the USB port on your computer, you may experience any of the following symptoms:
| • | The computer may stop responding (hang). |
| • | The computer may continuously restart. |
| • | Microsoft Windows 98 may not start properly |
Cause
This behavior can occur if the USB Host Controller or Root Hub conflict with another device.
Resolution.
Resolution.
To resolve this issue, use Device Manager to determine if the USB Host Controller or Root Hub is in conflict with another device.
Continue reading on how to troubleshoot it... (i'll show you the steps)
Friday, October 24, 2008
My new MP3 made by Creative
Monday, August 4, 2008
Free Download BIOS Update Utility

This utility updates the BIOS to version R1121Q0 to resolve the following issues:
1. Audio may not work properly after installing Microsoft® Windows Vista® Service Pack 1 (SP1)
2. AV mode and special function keys may not work properly
3. Characters are sometimes skipped when typing
2. AV mode and special function keys may not work properly
3. Characters are sometimes skipped when typing
Labels:
Technical,
Troubleshooting
Friday, August 1, 2008
YouTube Video Will Not Play Correctly
This issue may be resolved by updating to the latest version of Adobe Flash Player from the Adobe Web site at http://www.adobe.com/.
Monday, July 7, 2008
How to Reconfigure RAID?
Reconfigure RAID
Some changes in the RAID configuration cannot be performed after launching the VAIO Recovery Wizard from within the Microsoft Windows XP operating system. To remove an existing RAID array and delete all data from the connected drives, the computer must be restarted with the first disc from the Recovery Media Kit in the CD/DVD drive. Follow this procedure to confirm your selection in the Reconfigure RAID window.
NOTE: If you have not chosen to Create recovery discs, or if you intend to Go to Intel Matrix Storage Console to reconfigure an existing RAID array or create a new RAID volume, these options are also offered in the Reconfigure RAID window. Neither option requires restarting the computer.
1. From within the Recovery Wizard application, in the Reconfigure RAID window, click Restart from disc.
2. The appropriate CD/DVD drive will open.
3. At the Recovery dialog box, ensure Recovery Disc #1 is in the drive.
4. Click the OK button.
5. The computer will restart and the Recovery Wizard main menu will again be displayed.
NOTE: Fewer options are available in the Recovery Wizard when starting the computer from the Recovery Discs.
6. In the VAIO Recovery window, click Reconfigure RAID.
Some changes in the RAID configuration cannot be performed after launching the VAIO Recovery Wizard from within the Microsoft Windows XP operating system. To remove an existing RAID array and delete all data from the connected drives, the computer must be restarted with the first disc from the Recovery Media Kit in the CD/DVD drive. Follow this procedure to confirm your selection in the Reconfigure RAID window.
NOTE: If you have not chosen to Create recovery discs, or if you intend to Go to Intel Matrix Storage Console to reconfigure an existing RAID array or create a new RAID volume, these options are also offered in the Reconfigure RAID window. Neither option requires restarting the computer.
1. From within the Recovery Wizard application, in the Reconfigure RAID window, click Restart from disc.
2. The appropriate CD/DVD drive will open.
3. At the Recovery dialog box, ensure Recovery Disc #1 is in the drive.
4. Click the OK button.
5. The computer will restart and the Recovery Wizard main menu will again be displayed.
NOTE: Fewer options are available in the Recovery Wizard when starting the computer from the Recovery Discs.
6. In the VAIO Recovery window, click Reconfigure RAID.
Wednesday, July 2, 2008
How to Perform a System Recovery?
How to perform a system recovery?
NOTE: A recovery can also be performed using Recovery Discs.
1. On the taskbar, click the Start button, point to All Programs, point to Recovery, then click the Recovery icon.
NOTES: If there is no shortcut for the VAIO Recovery Wizard in the program list, start the program from Control Panel.
If the operating system will not start and no other troubleshooting can be performed, a recovery of the (C:) drive can be performed by starting the computer and pressing the F10 key.
2. In the Recovery window, click to select the appropriate option to use the Recovery Wizard:
NOTE: A recovery can also be performed using Recovery Discs.
1. On the taskbar, click the Start button, point to All Programs, point to Recovery, then click the Recovery icon.
NOTES: If there is no shortcut for the VAIO Recovery Wizard in the program list, start the program from Control Panel.
If the operating system will not start and no other troubleshooting can be performed, a recovery of the (C:) drive can be performed by starting the computer and pressing the F10 key.
2. In the Recovery window, click to select the appropriate option to use the Recovery Wizard:
Reinstall Applications or Drivers
Restore C: Drive
Restore Complete System
Reconfigure RAID
Troubleshooting is to be follow…
Restore C: Drive
Restore Complete System
Reconfigure RAID
Troubleshooting is to be follow…
Tuesday, June 24, 2008
When your Computer Crash

I made this article really short and clear so that everybody will benefit from it. If your computer is always crashing due to non responsive Operating System or software the main concern on how to deal with is by focusing in two subjects. The computers hangs if the the Memory that you are using is defective or the Hard disc is not that good anymore. Main clue are the following:
Wednesday, June 18, 2008
Video quality on the computer using the USB connection is poor quality
When digital video is transferred to a computer using the USB streaming feature on Digital8 digital video cameras and Mini DV camcorders, the quality of transferred video may fluctuate or may contain video noise. This is due to the high compression rate used by the USB streaming protocol. The aspect ratio of video using USB streaming is 352x240 pixels.
Video transferred to a computer using USB from a DVD or hard disk camcorder does not use the USB streaming protocols, therefore, the video is not compressed. The video is transferred at the same resolution that the camcorder recorded the video and should play back on the computer with the same quality in which it was filmed.
Subscribe to:
Posts (Atom)